
Table of Contents
ToggleIf you’ve ever stared at the back of a gaming PC and felt overwhelmed by the maze of ports, connectors, and mysterious buttons, you’re not alone. That rear panel is the nerve center of your entire gaming setup, get it wrong, and you’re looking at bottlenecked performance, dead monitors, or wireless connectivity that barely works. Get it right, and you’ve got a beast of a machine ready to push frames, stream gameplay, and handle multi-monitor configurations like a champ.
Whether you’re building your first rig, troubleshooting why your 240Hz monitor won’t hit its max refresh rate, or just trying to figure out which port does what, this guide breaks down everything you need to know about the back of your gaming PC. We’ll walk through motherboard I/O panels, GPU outputs, cable management tricks, and the setup mistakes that even experienced builders make. By the end, you’ll know exactly how to wire up your system for optimal performance and future-proof your connectivity as new standards roll out.
Key Takeaways
- Always connect your monitor to the GPU outputs, not the motherboard I/O panel, to ensure your discrete graphics card renders games at full performance instead of idling.
- Use DisplayPort 2.1 cables and connectors for high-refresh displays, as HDMI 2.0 cables will limit you to 144Hz or lower even with capable monitors and GPUs.
- Check the back of your gaming PC for the BIOS Flashback button to update motherboard firmware without a CPU installed—critical when new processors require updated BIOS versions.
- Organize cables by function using Velcro ties and labels, and route them away from case intake fans to maintain proper airflow and avoid performance throttling.
- Prioritize motherboards with USB4, WiFi 7, DisplayPort 2.1, and 2.5GbE Ethernet to future-proof your setup as next-generation peripherals and displays become standard.
- Position WiFi antenna connectors perpendicular to each other on your motherboard’s I/O shield, and use wired Ethernet for competitive gaming where latency is critical.
Understanding the Back Panel of Your Gaming PC
The back panel of a gaming PC isn’t just a cluster of random holes, it’s a carefully designed interface between your internal components and the outside world. Every port serves a specific purpose, and knowing what goes where can mean the difference between smooth 4K gaming at 144Hz and a frustrating troubleshooting session.
Why the Back Panel Matters for Gaming Performance
Your back panel determines how data flows in and out of your system. Plug your monitor into the wrong port, and your expensive GPU sits idle while the integrated graphics struggle to push frames. Use an outdated HDMI cable instead of DisplayPort, and you’re capping your refresh rate at 60Hz when your panel can handle 240Hz.
Beyond display outputs, the back panel houses your network connection, critical for competitive gaming where every millisecond of latency counts. It’s also where your audio equipment connects, your peripherals draw power and bandwidth, and where you’ll access BIOS flashback buttons when a motherboard update goes sideways. Ignore this area during setup, and you’re leaving performance on the table.
The layout and quality of these ports also dictate your upgrade path. A motherboard with USB 4.0 and Thunderbolt 4 support gives you headroom for next-gen peripherals and external GPUs. One stuck with USB 3.0 Gen 1 ports? You’re already behind the curve in 2026.
Motherboard I/O Panel vs. GPU Ports: Key Differences
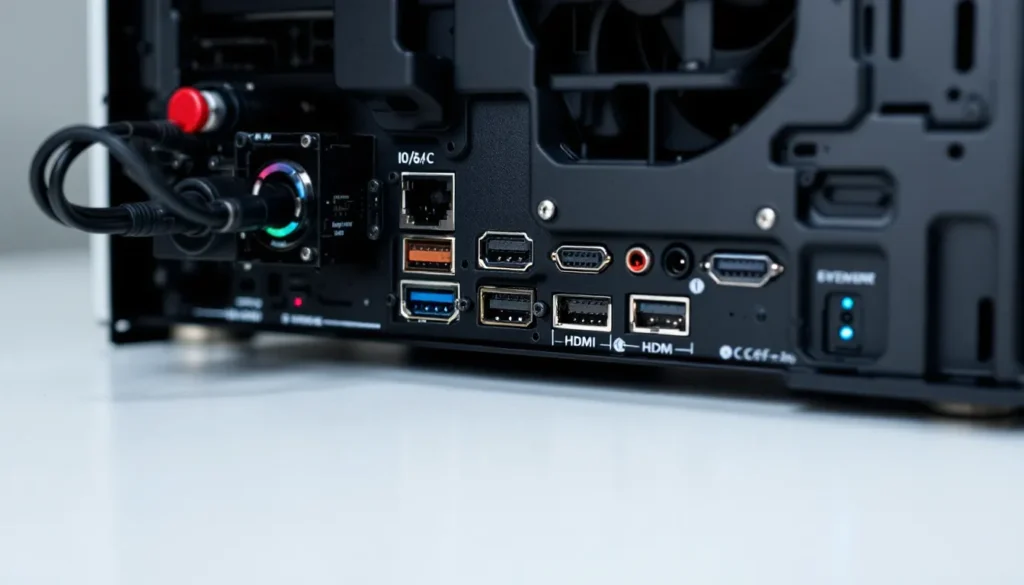
This is where most first-time builders trip up. The back of your PC has two distinct zones: the motherboard I/O panel (usually at the top) and the GPU ports (lower down, perpendicular to the motherboard).
The motherboard I/O panel handles everything except video output when you have a dedicated graphics card. You’ll find USB ports, audio jacks, Ethernet, WiFi antenna connectors, and sometimes legacy ports like PS/2. Some motherboards include HDMI or DisplayPort here, but these connect to your CPU’s integrated graphics, fine for troubleshooting or basic tasks, but useless for gaming when you’ve got a discrete GPU installed.
The GPU ports are where your gaming monitors should always plug in. These outputs connect directly to your graphics card’s processing power. Modern GPUs like the RTX 5080 or RX 8800 XT typically feature three or four DisplayPort 2.1 connectors and one or two HDMI 2.1 ports. The exact configuration varies by manufacturer and model.
Here’s the rule: if you’ve got a dedicated graphics card, your monitors plug into the GPU ports. Period. The motherboard display outputs essentially become decorative unless you’re running a server or troubleshooting a dead GPU.
Essential Ports and Connectors on a Gaming PC Back Panel
Let’s break down what you’re actually looking at when you spin your tower around.
Display Outputs: HDMI, DisplayPort, and USB-C
DisplayPort remains the gold standard for PC gaming in 2026. DisplayPort 2.1 (introduced in late 2024 and now standard on mid-range and high-end GPUs) supports up to 10K resolution at 60Hz or 4K at 480Hz with Display Stream Compression. For most gamers, that means rock-solid 4K 165Hz or 1440p 360Hz without breaking a sweat.
HDMI 2.1 is your other main option, especially if you’re hooking up to a gaming TV or running a console alongside your PC. It maxes out at 4K 120Hz or 8K 60Hz, which is plenty for couch gaming but falls behind DisplayPort for competitive esports setups with ultra-high refresh panels.
USB-C with DisplayPort Alt Mode is increasingly common on both motherboards and GPUs. It’s perfect for portable gaming monitors or docking stations, though you’ll need to verify that the specific USB-C port supports video output, not all of them do, even on the same motherboard.
One critical note: cable quality matters just as much as the port. A cheap DisplayPort cable from 2018 might not have the bandwidth for DisplayPort 2.1 features, even if both your GPU and monitor support them.
USB Ports: USB-A, USB-C, and Their Speed Standards
USB port naming is a nightmare, but here’s what you need to know for 2026:
- USB 3.2 Gen 1 (5 Gbps): The baseline. Fine for mice, keyboards, and older peripherals.
- USB 3.2 Gen 2 (10 Gbps): Blue or red ports, good for external SSDs and high-speed devices.
- USB 3.2 Gen 2×2 (20 Gbps): Usually USB-C only, found on enthusiast motherboards.
- USB4 (40 Gbps): The new standard. Supports Thunderbolt 3 devices, external GPUs, and blazing-fast storage. Typically one or two ports on Z890/X870E motherboards.
For gaming, USB speed affects input lag on wireless peripherals, charging speeds for controllers, and whether you can capture 4K footage to an external drive without dropped frames. The back panel typically has slower USB ports than the front panel’s high-speed headers, but they’re more reliable for always-connected devices like wireless dongles or racing wheel bases.
Many gaming motherboards now include a BIOS Flashback-capable USB port, usually marked with a special icon. This port remains powered even when the system is off, letting you update the motherboard firmware without a CPU installed, a lifesaver when new Ryzen or Intel chips require updated BIOS versions.
Audio Jacks and Optical Audio Outputs
Most gaming motherboards sport a 6-jack audio array: line out (green), line in (blue), mic in (pink), side speakers (gray), rear speakers (black), and center/subwoofer (orange). This setup supports 7.1 surround for analog headsets or speaker systems, though most gamers now use USB or wireless headsets and leave these empty.
S/PDIF optical audio (the square port with a little flap) is still present on higher-end boards. It’s perfect for connecting to external DACs, soundbars, or home theater receivers without electromagnetic interference. If you’re running a proper audio setup for single-player immersion, optical keeps the signal clean.
Integrated audio has improved massively. Chips like the Realtek ALC4080 or ALC4082 found on recent motherboards deliver low-noise, high-fidelity sound that many gaming hardware reviewers consider sufficient even for competitive use. That said, audiophiles and streamers often bypass onboard audio entirely with external USB DAC/amp combos.
Ethernet Port and Network Connectivity
Wired internet is non-negotiable for serious gaming. WiFi has come a long way, but Ethernet still offers lower latency, zero interference, and consistent bandwidth.
Most gaming motherboards in 2026 include 2.5 Gigabit Ethernet as standard (Intel I226-V or Realtek RTL8125BG controllers). High-end boards push to 5GbE or even 10GbE, which is overkill for gaming alone but useful for local file transfers, NAS setups, or streaming uncompressed footage to a capture station.
The Ethernet port usually has two LED indicators: one shows link speed (1Gbps, 2.5Gbps, etc.), the other blinks with activity. If you’re getting packet loss or lag spikes, checking these LEDs is step one in diagnosing cable or switch issues.
Power Supply Connections and External Power
The back panel isn’t just data, there’s power, too. The main power supply AC inlet accepts the cable from your PSU to the wall outlet. Next to it, you’ll find the PSU power switch, which physically cuts power to the entire system. Flip this off before swapping components or troubleshooting to avoid standby power damage.
Some high-end cases or custom builds expose additional power connectors for RGB controllers, fan hubs, or custom water-cooling setups, but these are less common on typical gaming rigs. The key is ensuring your PSU has enough wattage headroom, modern GPUs like the RTX 5090 can spike to 600W under load, so don’t cheap out with a borderline-adequate power supply.
Graphics Card Rear Panel: Maximizing Your Display Setup
Your GPU’s rear bracket is where gaming magic happens, or where it gets bottlenecked if you plug things in wrong.
Identifying GPU Outputs vs. Motherboard Outputs
This bears repeating because it’s the number one setup mistake: use the GPU outputs, not the motherboard outputs. If your monitor cable runs to the top cluster of ports (motherboard I/O), your discrete graphics card isn’t rendering anything. You’re gaming on integrated graphics, which means single-digit FPS in anything demanding.
GPU ports are perpendicular to the motherboard, occupying two to four expansion slot covers depending on the card’s thickness. They’re usually oriented horizontally when the PC is standing upright. On most modern cards, you’ll see a mix of DisplayPort and HDMI connectors, sometimes with a USB-C port for VR headsets or next-gen displays.
If you’ve accidentally plugged into the motherboard and installed your GPU drivers, Windows might not even recognize the mistake, it’ll just use the integrated graphics and leave your GPU idling at desktop clocks. Always double-check during initial setup.
Multi-Monitor Gaming Configurations
Running multiple displays is standard for gaming in 2026, primary monitor for gameplay, secondary for Discord/streams/guides, maybe a third for system monitoring or productivity.
Most mid-range and above GPUs support four simultaneous displays without breaking a sweat. You can mix and match resolutions and refresh rates, though Windows’ handling of mixed-refresh setups has improved dramatically since the Windows 11 24H2 update. The compositor now manages per-monitor refresh rates properly, so a 360Hz primary and 60Hz secondary won’t drag each other down.
For maximum flexibility:
- Use DisplayPort for your primary gaming monitor, especially if it’s high-refresh or adaptive sync.
- HDMI for secondary displays or TVs works fine, since they’re typically 60Hz or 120Hz.
- USB-C/Thunderbolt for portable monitors or docking setups.
Be aware of bandwidth limits. Running three 4K 144Hz monitors simultaneously might exceed the GPU’s total output bandwidth, forcing you to drop refresh rates or resolution on one or more displays. Check your GPU’s spec sheet for maximum simultaneous output capabilities.
For surround gaming (three monitors in landscape forming a single wide display), you’ll need NVIDIA Surround or AMD Eyefinity, but honestly, ultrawide monitors have mostly killed this setup. A single 49-inch 32:9 ultrawide delivers a similar experience with fewer bezels and simpler configuration.
VR Headset Connectivity and Requirements
VR headsets connect in one of three ways in 2026:
- DisplayPort + USB (tethered headsets like Valve Index, older HTC Vive models)
- USB-C/Thunderbolt with DisplayPort Alt Mode (newer tethered headsets, some with single-cable solutions)
- Wireless streaming (Quest 3, Pico 4 Ultra, standalone headsets using WiFi 6E/7 for PCVR)
If you’re going tethered, the GPU’s USB-C port (if equipped) is the cleanest solution, one cable for power, data, and video. Without it, you’ll use a DisplayPort output plus a USB 3.2 Gen 1 or faster port from the motherboard. VR is bandwidth-hungry, so don’t share that USB port with other high-speed devices.
For wireless PCVR streaming, the GPU outputs don’t matter, performance depends on your WiFi 6E/7 router and network congestion. But you still need a capable GPU: encoding the video stream in real-time for wireless transmission adds overhead. An RTX 5070 or RX 8700 XT is the realistic minimum for smooth wireless PCVR at high settings.
Motherboard I/O Shield: Features and Functionality
The I/O shield is the metal plate pre-installed or snapped into your case’s rear opening, providing cutouts for all the motherboard’s back panel ports. It’s easy to overlook, but modern I/O shields pack some surprisingly useful features.
Modern Motherboard I/O Layout Explained
A typical 2026 gaming motherboard I/O panel includes (from top to bottom, though layouts vary):
- WiFi antenna connectors (two gold-threaded posts)
- USB 3.2 Gen 2 Type-A ports (4-6 ports, sometimes color-coded)
- USB4 or Thunderbolt 4 Type-C ports (1-2 ports)
- HDMI or DisplayPort (for integrated graphics, if present)
- Audio jacks (5-8 jacks depending on board tier)
- S/PDIF optical out
- 2.5GbE or faster Ethernet port
- BIOS Flashback button (enthusiast/high-end boards)
- Clear CMOS button (some boards)
- Legacy ports (PS/2, rare in 2026 but still on some boards)
The layout reflects priorities. USB ports dominate because that’s how most peripherals connect. Display outputs are shrinking or disappearing entirely on boards paired with F-series Intel chips (no integrated graphics) or certain Ryzen X3D builds where the GPU is assumed.
BIOS Flash Button and Troubleshooting Features
The BIOS Flashback button is a small, recessed button near a specific USB port (often labeled “BIOS” or marked with an icon). It lets you update the motherboard firmware without a functioning CPU, RAM, or GPU installed, just the PSU, motherboard, and a USB drive with the BIOS file.
This feature is crucial in 2026. Intel’s Arrow Lake Refresh and AMD’s Zen 6 CPUs often require BIOS updates on existing motherboard chipsets. If you buy a Z890 board manufactured in mid-2025 and try to install a 2026-released CPU, the board might not POST without a firmware update. BIOS Flashback saves you from needing an older CPU just to boot up and flash the update.
Some boards include a Clear CMOS button on the back panel too, eliminating the need to open the case and short pins or remove the CMOS battery when your overclock goes wrong. Press it for a few seconds, and the motherboard resets to factory BIOS settings.
Both features are standard on mid-range and above boards (think ASUS TUF, MSI MAG, Gigabyte Aorus, ASRock Steel Legend tiers and up). Budget boards might skip them, which is fine if you’re not overclocking or chasing bleeding-edge CPU compatibility.
WiFi Antenna Connections for Wireless Gaming
Those two threaded posts sticking out of the I/O panel? That’s where the WiFi antennas screw in. Most gaming boards with WiFi ship with a small dual-antenna module, don’t lose it, and definitely don’t skip attaching it.
Without antennas, WiFi performance tanks. The onboard WiFi module (typically Intel AX210/AX211 or Killer AX1690/1675 in 2026) is capable of WiFi 6E or WiFi 7 speeds, but only if the antennas are properly connected. Range drops, speeds plummet, and latency becomes inconsistent.
Position the antennas perpendicular to each other (one vertical, one horizontal) for best omnidirectional coverage. If your router is in another room or on a different floor, consider upgrading to a higher-gain antenna set, third-party options with longer cables and stronger reception are available for under $30 and can dramatically improve wireless performance.
That said, if you’re serious about competitive gaming, Ethernet is still the way. WiFi 7’s ultra-low latency mode helps, but wired is wired.
Cable Management Tips for the Back of Your Gaming PC
The back of your PC doesn’t have to look like a rat’s nest. Good cable management improves airflow, makes upgrades easier, and honestly just looks better if anyone ever sees it.
Organizing Power and Peripheral Cables
Start by grouping cables by function: display cables, USB peripherals, power, and audio. Run similar cables together and use Velcro cable ties (not zip ties, those are permanent and annoying when you need to swap something).
For the main power cable and thick display cables, consider cable sleeves or spiral wrap to bundle them neatly. Route these along the back edge of your desk or down a desk leg using adhesive cable clips. The goal is to avoid tangles and make it obvious which cable goes where when you inevitably need to troubleshoot.
Label your cables. Seriously. Use a label maker or even just masking tape and a Sharpie. When you’ve got three identical black DisplayPort cables running to different monitors, labels save you from trial-and-error replugging.
For USB peripherals (keyboard, mouse, headset dongle), plug them into the motherboard’s USB cluster in a consistent order. Top ports for high-bandwidth devices (wireless headset dongle, USB DAC), bottom ports for low-bandwidth stuff (RGB controller, keyboard). This keeps faster devices from sharing a USB controller with slower ones, which can cause polling rate issues on high-end gaming mice.
Preventing Cable Clutter and Improving Airflow
Airflow matters even for cables outside the case. A massive tangle of cords behind your PC can trap heat and restrict cool air intake if your case pulls air from the rear or bottom.
Mount your PC on a desk or raised stand, not directly on carpet. This keeps dust down and improves airflow. Route cables to the side or beneath the desk using a cable tray or under-desk basket. This gets the mess out of sight and keeps cables from draping over your case’s intake fans.
If you’ve got RGB or fan controller cables running out the back to an external hub, tuck them close to the case using cable clips. Loose cables dangling in front of exhaust fans can actually vibrate and create noise under load.
For extreme cleanliness, some PC setup guides recommend running cables through a hole drilled in the desk (if you’re into modding furniture) or using a monitor arm with integrated cable routing. This is overkill for most, but it does look slick for streaming or content creation setups where your desk is on camera.
Common Setup Mistakes and How to Avoid Them
Let’s talk about the stuff that trips up even experienced builders sometimes.
Plugging Monitor into Motherboard Instead of GPU
We’ve mentioned this multiple times because it’s that common. The symptom: your brand-new RTX 5080 or RX 8800 XT shows 0% utilization in Task Manager while gaming, and you’re getting 30 FPS in Cyberpunk 2077.
The fix is simple, move the cable from the motherboard’s display outputs to the GPU’s outputs. If you’re not sure which is which, the GPU ports are horizontal (parallel to the floor when the case is upright) and located lower on the back panel, while motherboard ports are vertical in the top cluster.
Some motherboards automatically disable integrated graphics when a GPU is installed, but not all do. If you’ve got video output from the motherboard ports and your GPU installed, you’re wasting the GPU entirely.
Using Incorrect Display Cables for High Refresh Rates
You bought a 240Hz 1440p monitor. You plug it in with the HDMI cable that came in the box. You’re confused why the monitor settings max out at 120Hz or 144Hz.
Here’s why: not all cables support all refresh rates and resolutions. HDMI 2.0 cables (still common in the wild) cap at 1440p 144Hz. For 240Hz at 1440p, you need HDMI 2.1 or, better yet, DisplayPort 1.4 or 2.1.
Older DisplayPort cables (1.2 spec) can’t push 4K beyond 60Hz or 1440p beyond 165Hz depending on color depth. Always use the cable that shipped with your monitor, manufacturers match the cable spec to the panel’s capabilities. If you need a longer cable or lost the original, buy a certified DisplayPort 2.1 or HDMI 2.1 cable from a reputable brand.
Another gotcha: some monitors have multiple input ports, and not all ports support the full refresh rate. A monitor might have HDMI 2.0 and DisplayPort 1.4 inputs, plug into HDMI and you’re capped at 144Hz: use DisplayPort and you get the full 240Hz. Check the monitor’s manual or reviews from tech publications to confirm which input supports max specs.
Ignoring BIOS Update Ports and Features
BIOS Flashback and Q-Flash Plus are lifesavers, but only if you know they exist. If your new CPU won’t POST and you’re panicking, don’t assume the motherboard or CPU is dead. Check if your board supports BIOS Flashback.
Download the latest BIOS file from the motherboard manufacturer’s website, extract it to a FAT32-formatted USB drive (not exFAT, not NTFS, FAT32), plug it into the designated BIOS Flashback port, and press the button. The board flashes the update directly from the USB drive, no CPU required. The process takes 5-10 minutes: the LED will blink and then turn solid when it’s done.
Ignoring this feature means unnecessary RMAs, trips to a repair shop, or buying an older CPU just to boot and update the BIOS. Save yourself the headache.
Upgrading and Future-Proofing Your Back Panel Setup
Your back panel isn’t static, you can expand it, and you should plan for what’s coming down the pipeline.
Adding Expansion Card Ports and Functionality
Ran out of USB ports? Your motherboard only has 2.5GbE but you want 10GbE for your NAS? Need internal Thunderbolt 4 headers for front-panel connectivity? Expansion cards solve all of these problems.
PCIe USB expansion cards add 4-8 additional USB 3.2 ports, and some include internal headers for front-panel connectors. These cards occupy a PCIe x1 or x4 slot and are dirt cheap ($20-50). Just make sure your motherboard has a free slot, many M.2 slots share PCIe lanes with expansion slots, so installing an NVMe drive might disable a slot or two.
10GbE network cards are sub-$100 now and transform local file transfers if you’ve got a matching switch and NAS. For gaming, it’s overkill, but for content creators moving massive video files or game captures, it’s a huge quality-of-life upgrade.
Sound cards are making a comeback for audiophiles and streamers. While integrated audio is good, dedicated cards like the Sound Blaster AE-9 or ASUS Xonar series offer better DACs, cleaner output, and more headphone amp power for high-impedance cans.
Capture cards (Elgato 4K60 Pro, AVerMedia Live Gamer 4K) install internally and add HDMI inputs to your back panel, perfect for dual-PC streaming setups or capturing console gameplay.
Before buying expansion cards, verify your motherboard has available PCIe slots and that the lanes aren’t shared with M.2 drives you’re using. Check the motherboard manual’s PCIe lane allocation chart, this is non-negotiable.
Preparing for Next-Gen Connectivity Standards
We’re on the cusp of several new standards that’ll reshape back panels over the next few years:
- USB4 Version 2.0 (80 Gbps, double the bandwidth of current USB4) is starting to appear on 2026 flagship motherboards. It’ll enable seamless external GPU enclosures and massive storage arrays without compromise.
- DisplayPort 2.1 UHBR 20 (Ultra High Bit Rate 20 Gbps mode) is now in GPUs, supporting 4K 480Hz or 8K 120Hz without compression. Future monitors will lean heavily on this.
- WiFi 7 (802.11be) is rolling out fast, with multi-gigabit speeds and latency under 2ms in ideal conditions. If you’re buying a motherboard in 2026, don’t settle for WiFi 6E, WiFi 7 is the standard now.
- PCIe 5.0 expansion slots are common on current boards, but PCIe 6.0 is on the horizon (2027-2028 consumer launch). For now, PCIe 5.0 is more than enough, even RTX 5090 doesn’t saturate PCIe 4.0 x16 bandwidth.
When spec’ing a new build, prioritize:
- USB4/Thunderbolt 4 for peripherals and external devices
- 2.5GbE or faster Ethernet
- WiFi 7 if going wireless
- DisplayPort 2.1 on the GPU
- Plenty of USB 3.2 Gen 2 ports (10 Gbps)
These features ensure your back panel won’t feel dated in two years when next-gen peripherals and displays hit the market.
Conclusion
The back of your gaming PC is where your hardware meets the real world, and where most performance issues start if you get it wrong. Plugging your monitor into the GPU instead of the motherboard, choosing the right cables for high refresh rates, and organizing your setup for clean airflow aren’t complicated, but they’re critical.
Understanding the difference between motherboard I/O and GPU outputs, knowing which USB port to use for BIOS updates, and planning for future connectivity standards will save you hours of troubleshooting and hundreds of dollars in unnecessary upgrades. Your back panel is more than just a bunch of ports, it’s your system’s gateway to peak performance.
Take ten minutes to audit your current setup. Are your monitors plugged into the GPU? Are you using the right cables? Is your Ethernet connected? Small fixes now mean smoother gameplay, fewer headaches, and a rig that’s ready for whatever comes next.